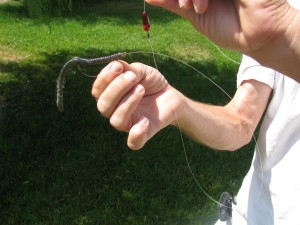
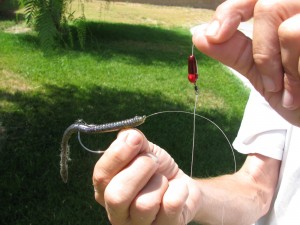
We’ve had some great questions coming from our readers including the subject of today’s article. “How do you tie a Carolina rig?” The c-rig or ball and chain, as it is often referred to, has been around for decades and still catches fish consistently. There have been a lot of variations and, in my opinion, some great improvements over the years which we’ll discuss later. First let’s look at how to tie this rig.
How To Tie A Carolina Rig
You begin by threading a weight and bead up your main line. Then tie a swivel below these components. Next, tie about 30 inches of line on the other end of the swivel. You then tie your hook on, thread your bait of choice, and you’re ready to fish. It really is that easy.
Let’s look at each of the components in turn and discuss your options for those specific pieces.
The Weight
The first thing that you thread onto your main line is your weight. These are available in a number of sizes. You will choose heavier or lighter depending on how deep you want to fish and how fast you want to get down. Generally speaking, I use between a 3/16 and 3/4 of an ounce. I also prefer to use tungsten as opposed to lead for two reasons. One, the tungsten is smaller for the same weight which allows it to slip through cover more easily. This can be important when you are fishing around structure.
Secondly, tungsten has been shown to amplify sound better in the water than lead which is a necessary component of this rig. The weight hits the bead as you’re retrieving your lure and creates a clicking sound that tends to draw fish in for a closer look. This is why you don’t peg your sinker on the c-rig. You won’t generate any sound unless the weight is allowed some freedom of movement.
The Bead And Swivel
Just behind your weight is a bead. Originally, most of these were made out of plastic which was fine but didn’t really give you the option
of changing the sound at all. I personally prefer glass beads as the sound seems to imitate the clacking of crawfish more closely. I also use only these two components above the swivel.
For the swivel, I prefer Spro. In my opinion, their swivels are well made and I have never had one fail on me.
The Hook And Lure
The business end of the c-rig is of course your hook and lure. Let’s start here with what I consider are the improvements over years past. To begin with hooks are sharper now than they have ever been. It’s very rare to have to sharpen them these days with the technological advancements we have seen in the last couple of decades. They also tend to be more durable than in the past. I for one no longer sharpen any worm hooks as I cannot get them sharper than from the factory.
Another improvement over past years is the lures themselves. Worms now have better action and more choices than ever. Many of them have tails that are neutrally buoyant or float. This is an advantage when you’re using the old ball and chain. Your weight gets you down where the fish are and the buoyancy of your lure keeps it in the fishes face.
You can also get clackers that will go behind the bead to generate more sound but this is something that may or may not improve the number of strikes you get. For me, the jury is still out when it comes to these.
Fishing With The Carolina Rig
You will usually fish this rig over sunken islands, crawling along creek-beds, up, over and back down the sides of points or in long flats when the fish are in a negative mood.
Yes, you have to slow down with the Carolina rig but it will catch fish and can get any number of lure styles in front of fish including worms, lizards, fluke style baits, french fry’s and craw style plastics to name a few.
I hope that this helps and don’t forget to drag this rig with very short, sharp pops of the rod tip interspersed to best utilize the sound of the bead against the weight.
See ya’ on the water …

